Search Results
Results found for empty search
- Jim Lakin MD, Dakota County Master Gardener | DCMGV
< Back New Jersey Tea (Ceanothus americanus): A Short Showy Shrub Jim Lakin MD, Dakota County Master Gardener New Jersey Tea (Ceanothus americanus) is in no way related to Earl Grey or the American mafia. Read this article about how this hardy, long-lived native perennial shrub got its name. Continue reading to learn more about this native shrub’s attributes and how to use New Jersey Tea in your garden. New Jersey Tea ( Ceanothus americanus ) is in no way related to Earl Grey or the American mafia. Its curious name was coined during the American Revolution when its leaves were used as a substitute for the imported English version. Never having tried the concoction, I cannot vouch for either its taste or its safety. I can however, attest to the plant being a hardy, long-lived native perennial shrub. Ceanthus americanus in summer bloom In the wild New Jersey Tea thrives on upland prairies and savannas in full sun to partial shade. It is found throughout eastern and central North America, growing some three feet tall and five wide. Ceanothus americanus is hardy from Zones 3 through 9 so it does well even in Northern Minnesota. It makes an excellent low hedge where privacy is not an issue. New Jersey Tea works especially well on rocky hillsides and slopes. It does require well-drained soil which can be either sandy or loamy. The shrub has a deep tap root which makes it especially drought resistant and low maintenance when established. It is a slow grower, however and will take two to three years to establish itself. Once settled in, New Jersey tea boasts beautifully glossy green leaves topped by frothy white clusters of flowers that adorn the shrub in July and August. Thus, it adds color to the garden at times when not much is otherwise happening. These flowers go on to produce black seed capsules which explode in early fall. The capsule remnants remain on the bush through the winter, adding interest. New Jersey Tea is deciduous and blooms off new wood. Therefore, it can be pruned back in the fall or early spring, if desired. I prefer, however, to leave it in its natural state. Ceanothus americanus foliage As you might expect from such a ubiquitous native perennial, it is quite pollinator friendly. Hummingbirds especially appreciate the smaller insects that are drawn to the summer blooms. It is a host plant for both Spring Azure and Summer Azure butterflies ( Celastrina ladon ) . It is said to be deer resistant although other sources state deer use the twigs as a major food source throughout the year. Frankly, most anything is potential chow for Bambi. Since it is slow growing it usually is available in nurseries only in smaller sizes. Be patient, however and you will be richly rewarded by this lovely plant. Photo Credit: US Fish & Wildlife Service (1), Go Botany (2)
- Carole Dunn, Master Gardener | DCMGV
< Back Growing Ginger Carole Dunn, Master Gardener Growing ginger is relatively easy, and it can be grown both indoors and outdoors. Read this article to learn the steps to grow ginger successfully. Growing ginger is relatively easy, and it can be grown both indoors and outdoors. Here are the steps to grow ginger: Choose the right ginger: You can buy ginger roots from the grocery store or garden center. Look for pieces that are plump, with firm skin, and have several eye buds, which are small yellowish tips on the surface of the ginger. Prepare the soil: Ginger prefers well-draining soil that is rich in organic matter. Add compost or well-rotted manure to the soil to improve fertility and drainage. Plant the ginger: Cut the ginger into small pieces, making sure each piece has at least one eye bud. Plant each piece about 2 inches deep, with the eye facing up, and space them about 6 inches apart. Water regularly: Ginger needs to be watered regularly, but make sure not to overwater it as it can cause the root to rot. Keep the soil moist but not soggy. Provide warm temperatures: Ginger grows best in warm temperatures. Ideally, the temperature should be between 70 - 80 °F during the day and 60 -70°F at night. Provide shaded light: Ginger prefers partial shade and indirect sunlight. If growing indoors, place the ginger in a bright room with indirect sunlight. Harvest ginger: Ginger takes about 8 – 10 months to mature. Once the stems begin to turn yellow and die, it is time to harvest. Carefully dig up the ginger roots without damaging them. By following these steps, you can grow delicious ginger at home! Photo Credit: www.flavorexplosions.com (all creative commons)
- Marjorie Blare, Master Gardener | DCMGV
< Back Deciphering Seed Catalogs Seed catalogs start coming in January or February - a good time to start dreaming of your next garden! But there is so much information packed into a seed catalog it can be hard to interpret the abbreviations and array of plant varieties. This article will help you to decipher your seed catalogs so that you can choose the best plants for your garden. Marjorie Blare, Master Gardener Seed catalogs start coming in January or February - a good time to start dreaming of your next garden! There is so much information packed into a seed catalog! Most people have no problem with the catalogs’ rapturous descriptions of flowers or produce. After all, the catalogs are full of (probably 'enhanced') photos! More bewildering are the icons next to the photos. A good catalog has a key that explains what each icon means. They might have a drawing of a circle that is half dark and half light. They should also explain how many hours of direct sun that icon indicates, perhaps 4-6 hours. The key may be at the front of the catalog, or at the bottom of the page. Plant descriptions can have letters next to them. For instance, tomatoes may have the letters VFM. This means that variety has resistance to verticillium, fusarium wilt and nematodes. Without those letters, describing a plant as “disease resistant” is useless. Tomatoes will be listed as determinate (bush) or indeterminate (vining). You may find the letters OP (open pollinated), F1 (first generation hybrid) or X (a 'cross') in its name. F2 is a hybrid that can only be propagated vegetatively. These letters are important if you wish to save seeds. The OP seeds will breed true, but not the others. Flowers will have 'days to bloom' and/or 'bloom season' in their description, and veggies will have days to maturity or harvest. Note: 'days to harvest' for plants started indoors count from the day it is planted out. These numbers are based on the seed company's test gardens; choosing northern-grown seeds or plants, will make those numbers more accurate in Dakota County. The description or icon will tell you when to direct-sow the seeds or when to start them under lights. The latter requires you to know the average date of the last or first frost. Dakota County's dates are May 8th and October 10th respectively. It will tell you how many seeds are in a package, how far apart to plant, soil conditions (alkaline or acidic, clay, sandy, loamy) and watering requirements. Left-over seeds can be donated to a seed library, shared with friends or saved in a dry jar in the refrigerator. There will be shipping charges on the packages of seeds, so try to order all at once, or with friends, or with a heavier item. If you are getting perennials, make sure to choose plants that will grow in our U.S. Department of Agriculture (USDA) zone. Dakota County is zone 4. Some catalogs “stretch” the range of zones, so try to compare what different catalogs claim about the same plant or seed. Some catalogs include a USDA map and perhaps a table of temperature ranges. The catalog should list the scientific name of the plant, because common names are frequently shared by several unrelated plants. On-line catalogs will have simplified descriptions, but also have links to click to open up more information. They may also have customer reviews which are very helpful! Photo credit: www.ag.ndsu.edu (1)
- Mickey Scullard, Dakota County Master Gardener | DCMGV
< Back Swiss Chard – It’s Like Spinach, But It’s Not Swiss Chard (Chard) is a dark leafy green that can be used raw or cooked. It also freezes well for winter consumption. Chard can be planted any time during the growing season and re-blooms after harvesting. Not only is it nutritious but it looks beautiful in the garden, as well. Read this article to learn why and how to grow Swiss Chard in your garden. Mickey Scullard, Dakota County Master Gardener Swiss Chard (Chard) is in the beet family, ( Beta vulgaris) and is very easy to grow. Like spinach, you can direct seed Chard, however, you will want to wait until all danger of frost is past. Unlike spinach, Chard is not sensitive to day length and does not bolt when the days get longer and it gets hot in early summer. Very rarely, if planted too early while temperatures are cold or cool, Chard may bolt. You only need to plant Chard once in the spring and it will keep re-growing after each harvest through Fall. While spinach will regrow if baby leaves are harvested early, it will eventually bolt in early summer. You do not have to plant or replant Chard for a fall crop (which you may want to consider in late August for spinach) and if you miss getting it planted in spring, you can plant it at any time during the growing season. So, if you haven’t planted it yet, go ahead and get some Chard seeds sown. Swiss Chard seedlings You will want to manage the weeds around Chard to prevent it from having to compete for water and nutrients. Keep it regularly watered. If drought conditions exist, leaf growth will slow. As soon as it has sufficient water again, it will resume growing. To harvest Chard, you can pick the leaves at varying sizes based on your preference. Some people will cut the leaves just above the base of the plant (the crown). The leaves do pick up dirt in the stalks and leaves, so you will want to wash it well to avoid a gritty bite. Simply wash well in cool water. You will be able to harvest Chard into the Fall months, sometimes even after the first snowfall. Chard freezes well, requiring simple blanching in boiling water, followed by a cool water bath, and bagging it in a freezer bag. Nutritionally, Swiss Chard provides many important nutrients such as Vitamin K and Vitamin A. It also provides Vitamin C and magnesium and contains antioxidants including beta-carotene, lutein, and zeaxanthin. It is low in carbohydrates and is low calorie (depending upon how it is cooked). Some studies suggest it can help with blood sugar control, support heart health, reduce blood pressure, and other health benefits. Some articles label it a ‘superfood’. On top of all that goodness, Chard can be a lovely addition to a landscape as the stalks and leaf veins range in color from bright white (Fordhook most common variety), to yellow, gold, green, orange, pink, red, or striped. Some varieties are: “Bright Lights”, “Rainbow”, “Rhubarb”, “Neon Lights”. Paired with annual or perennial flowers, the green, bronze, or purple leaves with their showy veins and stalks add texture and color to containers and flower gardens. Consider adding Swiss Chard to your garden for both its beauty and nutritional values! References: Growing spinach and swiss chard in home gardens https://extension.umn.edu/vegetables/growing-spinach-and-swiss-chard#harvest-and-storage-390412 Swiss Chard https://hort.extension.wisc.edu/articles/swiss-chard/ Healthline: https://www.healthline.com/nutrition/swiss-chard Health benefits of swiss chard: https://www.medicalnewstoday.com/articles/284103 Allergy Associates of LaCrosse: https://lacrosseallergy.com/resources/diet-and-nutrition-counseling/superfoods/swiss-chard/ Photo Credits: University of Delaware (1), University of Minnesota Extension, Gardening: Swiss Chard (2), University of Wisconsin Extension (3,4,5,6)
- Gail Maifeld, Master Gardener | DCMGV
< Back Poinsettias – A Home in Mexico and Dr. Poinsett Gail Maifeld, Master Gardener The Poinsettia is a weed in its native Mexico. It is called lobster plant or Mexican Flame Leaf and has become an essential part of North America’s Christmas décor. The poinsettia that adorns mantles, coffee tables, and bookcases across North America is a descendant of a 6-foot shrub from which growers in Scandinavia and California developed the scaled-down varieties that bloom indoors. All poinsettias are winter-flowering shrubs that are noted for the bright red bracts or leaves. Modern plants have bracts that measure 12-15 inches with green leaves. The real flowers are the insignificant, greenish-yellow center clusters. Today plants can be purchased in many colors from white, peppermint (red & white,) pink and others. Keep a Poinsettia at normal room temperature (60-80 degrees) in a bright filtered location such as opposite light filtering blinds. Water only when the foliage droops slightly: the potting soil should then be totally saturated. No fertilization is necessary. Most individuals discard the plant soon after the holidays but with care you can have bright red bracts until April. Some enthusiasts will attempt to follow the strict schedule of taking cuttings or allow the cut back stump to develop new growth. Commercial producers follow a strict routine that is difficult for the home grower to mimic. Poinsettias are short-day plants; the flower and bract formation is prompted by an eight-week period of 14 hours total uninterrupted darkness and 10 hours of light daily. Plants are treated with a dwarfing chemical that reduces stem length, which results in the Poinsettia plant we know today. Poinsettias are readily available so this procedure is not needed to enjoy this beautiful plant. The Legend of the Poinsettia by Tomie dePaola tells the story of a young Mexican girl who had nothing for the manger scene on Christmas Eve. She picked tall green weeds to place around the stable and as the congregation prayed bright red star flowers burst open on the weed tips, casting a warm glow around the manger scene. The people named the plant la Flor de Nochebuena or Flower of the Holy Night. Dr. Joel Roberts Poinsett, the US ambassador to Mexico from 1825-1830, brought the shrub to the United States in 1830 because the bright red leaves, which he thought to be the flower, fascinated him. He took cuttings from shrubs growing near his Mexican residence to his home in South Carolina. The plant was named for Dr. Poinsett as the Poinsettia. Nothing says Merry Christmas like a bright red Poinsettia. Remember to thank Dr. Poinsett for this cheerful holiday plant! For more details on caring for poinsettia, visit this UMN Extension link. Additional sources: Tomie dePaola. The Legend of the Poinsettia. G.P. Putmans & Sons, 1994. Huxley Anthony, Editor. Success with House Plants, Readers Digest,1979.
- Brenda Hansell, Master Gardener | DCMGV
< Back Pound Flowers for Summer Fun Brenda Hansell, Master Gardener Many of the flowers you have enjoyed throughout the summer will soon fade away. Even cut flowers last only a few days in the house. Here is a fun way to preserve flowers and entertain the children. Flower pounding is an easy activity for most any age. Adult guidance and assistance will vary from child to child. When complete, my granddaughter jumped up, threw her hands in the air and shouted: “YAY, ART!!” (‘nuf said.) Read this article to learn how to share this fun activity with the child in your life. Materials: Watercolor paper (optional card stock) Parchment or wax paper Masking tape Hammer or mallet Fresh flowers Steps: 1) Gather the flowers. Bright colors such as red, yellow, and blue release more intense pigments. 2) Trim off the stems close enough to the base of the flower to permit it to lay flat while keeping the bloom intact. Use some of the leaves as well. 3) Flowers with large centers, such as cone flowers, will require removal of the thick center. Use only the carefully placed petals. Otherwise, there will be too much dark pollen “explosion.” (Though it does create a rather interesting, abstract appearance!) 4) Work on a hard, flat surface 5) Arrange the flowers face down on the watercolor paper. 6) Carefully cover with the wax paper 7) Press down firmly on the wax paper and tape in place 8) To get the feel of how firmly to pound & which flowers transfer best, you may want to try one or two “practice flowers” on a separate paper. (This is an optional step.) 9) Using firm pressure begin pounding the flowers, working in from the edges 10) Carefully, lift the wax paper to check the transfer 11) Continue pounding until desired effect is achieved. 12) Some pieces of petals and leaves may stick to the paper. Gently use your fingernail to scratch them off. 13) Frame and admire the finished piece of ART! Note, some folks embellish the print with colored pencils or fine painted brush strokes. Photo credits: Branda Hansell (all)
- Julie Harris, Dakota County Master Gardener | DCMGV
< Back Master Gardeners Answer Your Questions One of the most important services that the Master Gardeners in Dakota County provide to the community, is answering garden and environmental related questions. This article explains some of the ways that you can have your gardening questions answered by a certified Master Gardener in Dakota County. In particular, at Farmers Markets around the county, you can find MGs at their “Ask a Master Gardener” table, ready to answer your gardening questions Julie Harris, Dakota County Master Gardener One of the most important services that the Master Gardeners in Dakota County provide to the community, is answering garden and environmental related questions. “Ask a Master Gardener” volunteers can be found at various places but primarily at Farmers Markets around the county. At these events, you can find MGs at their table, ready to answer your gardening questions. Look for the familiar MG sign and table cloth! In order to be certified as a MG, an individual must complete a horticulture course in research-based, best horticultural practices through the University of Minnesota Extension. University faculty provide education on a wide array of horticultural subjects; for example – herbaceous and woody plants; growing vegetables and fruit; weeds; soil; composting; fertilizers; trees; lawn care and others. MGs combine this education with their own experience to provide you with gardening information. If they can’t answer a question on the spot, they will research the answer and get back to you. Additionally the MGs have handouts on relevant topics such as plants for pollinators, native plants, invasives, lawn care, and soil testing. In Dakota County, this project is led by Paul Wood and Rozanne Witter – both very experienced Master Gardeners. However, many other Master Gardeners volunteer their time and knowledge at community events. In fact, last year, MGs volunteered over 300 hours at the markets and answered almost 1100 questions! During the warm months, you can find MGs at these Farmer’s Markets: Apple Valley – Western Dakota County Service Center, 14955 Galaxie Ave Eagan -- Eagan Community Center, 1501 Central Pkwy Burnsville -- Mary, Mother of the Church, 3333 Cliff Rd East Lakeville - 20851 Holyoak Avenue During the winter months, MGs are often available at the Apple Valley Bachman’s and the Eagan Market Fest. For information about where and when Master Gardeners will be at one of these locations, this link will take you to the Dakota County Master Gardeners’ event schedule. An “Ask a Master Gardener” table is also available at our annual May Plant Sale and Let’s Get Growing spring kick-off event and the Burnsville Native Plant Sale. If you would like an “Ask A Master Gardener” table at your event, please complete the Contact Us form on our website. Ask a Master Gardener Line Master Gardeners in Dakota County also participate in the Minnesota Landscape Arboretum “Ask a Master Gardener phone line.” If you have gardening questions when you are not at an MG event, this is a great resource for you. Simply call the phone line (612-301-7590), leave your phone number and as much information as possible. A Master Gardener will get back to you within 24-48 hours. The mission of the Master Gardener program is to provide members of the community, research-based information on best practices in consumer gardening and caring for the environment. The “Ask a Master Gardener” project is a great way for us to connect with you and provide the information that you need! See you soon at a Farmers’ Market near you! Photo credits: Paul Wood (1,2)
- Vida Dam, Dakota County Master Gardener | DCMGV
< Back Dormant Seeding, Preparing Your Lawn for Next Year Vida Dam, Dakota County Master Gardener Plant grass seed in your lawn now? We may think it is winter already and the growing season is done, but November is the best time for dormant seeding! This is a late-fall technique that involves sowing grass seed after the growing season has ended and before the ground is permanently frozen. Dormant seeding has many benefits, as discussed in this article, but certain methods must be used in order to achieve success. Read on to discover how to dormant seed your lawn. We may think it is winter already and the growing season is done, but November is the best time for dormant seeding! This is a late-fall technique that involves sowing grass seed after the growing season has ended and before the ground is permanently frozen. The benefits of the cold will prevent the seed from germinating this year, leverage our Minnesota's natural freeze-thaw cycle of winters to work the seed into the soil, and allow the new grass seed to germinate very early in the spring when it is still wet and cold. Dormant seeding gives the lawn a head start next year before the summer heat and annual weeds emerge. Is this good for every lawn? This is great for sparse lawns, bare patches, and thin lawns that need to be thickened. It is not as effective if the lawn is already thick and dense as the seed needs good seed-to-soil contact. When to Dormant Seed the lawn? Timing is very important as grass seeds should not germinate this fall. If the seed germinate/sprout this fall, the immature seedlings may not survive the winter. The target is to apply the dormant seeds before the first major snowfall between mid/late October to mid-November when the temperature is too cold for germination. The seed must be put down while the ground is not frozen but is cold. Day time temperature should be around 35-40 degrees Fahrenheit, and soil temperature is below 50 degrees Fahrenheit. ** Tip : if the lawn is actively growing and being mowed, it is too early for dormant seeding. How to Dormant Seed - the steps: Select the desired grass seed: For Minnesota lawns look up options based on site conditions and maintenance on the UMN extension. (see additional resources below) An average Minnesota lawn may have a mix of Kentucky bluegrass, fine fescue, and small amounts of perennial ryegrass. Prepare the lawn: Mow the existing lawn slightly lower than normal to approximately 2 inches in order to allow the seed to reach the soil. Loosen the soil surface so the seed can have easier seed to soil contact. Using a hand rake for small areas of bare or thin lawn is an option. For larger areas, a vertical mower, dethatcher, or scarifier is an option. Rake up any debris Spread the seed & ensure contact: Use the recommended rate for the grass seed and lightly incorporate it into the existing soil with a hand rake. Water lightly & thoroughly Water the area lightly and thoroughly after laying the seed. Do not water too much, the soil should be barely damp - between dry and damp. Only in extreme drought, is additional watering needed. Continuous watering is not needed until the seed germinate in the spring. What to expect in the Spring: The results of dormant seeding depend on Minnesota winter conditions. With more snowfall that can cover and protect the areas, the higher chance of success. Seedlings will germinate by late April and early May as the temperature warms. Be patient as it takes 10-14 plus days for grass to sprout. If the area is a little thin, give it some time and it is not unusual to have additional reseeding in the spring. Avoid heavy traffic on the young seedlings and consider fertilization to assist with lawn establishment Warning: Do not apply a pre-emergent weed preventer in the spring as it will prevent grass seed from germinating. Happy dormant seeding! For more information, please see links and resources below: Learn More here: Dormant Seeding: https://extension.umn.edu/lawn-care/dormant-seeding Dormant Seeding Bee Lawns: https://extension.umn.edu/yard-and-garden-news/dormant-seeding-bee-lawns#:~:text=Dormant%20seeding%20provides%20the%20best,soil%20moisture%20for%20germinating%20seeds Turfgrass Seed for Minnesota Lawn: https://extension.umn.edu/lawn-care/buying-turfgrass-seed-minnesota-lawns Gall Dormant Seed: https://www.gertens.com/learn/fall-dormant-seeding#:~:text=Photo%20by%20the%20University%20of,your%20new%20seed%20will%20sprout . Photo Credit: University of Minnesota Extension (1,2,3)
- Jim Lakin, M.D., Master Gardener | DCMGV
< Back Buttonbush (Queen of the Wetlands) Jim Lakin, M.D., Master Gardener Buttonbush is a great shrub for naturalizing in wet areas and attracts butterflies. Read more about its attributes. We have some wonderful marsh lands on our property. Among the Giant Blue Lobelias and the Cardinal flowers, there’s a delightful shrub that stands out, the Buttonbush ( Cephalanthus occidentalis ). This is a native perennial plant to much of the Eastern North America from Nova Scotia to Minnesota, south to Florida and East Texas. You’ll find it in a range of wetland habitats including swamps, floodplains, mangroves, around ponds and margins of streams and even moist forest understories. It grows as a deciduous shrub or small tree, running from three to ten feet in height. It has glossy green leaves which appear in the late spring. Its unique fragrant white to pink bloom, shown in the first picture, gives it its common name. Buttonbush usually blooms from June through September although this period may be shorter further north. It was introduced commercially in 1735 as a source of nectar for commercial honey production. Thus, it’s other common name, Honey Bells. Buttonbush forms an important link in the wetland ecology. A number of waterfowl eat the seeds and wood ducks use the plant as nest protection. We’ve had a pair in our pond for several years that seem to regularly avail themselves of our buttonbushes building material. Deer browse the foliage which surprisingly is poisonous to livestock. Darn deer eat anything! A number of native as well as honey bees feed on the nectar as do hummingbirds. The plant acts as larval host to Titan Sphinx, Walnut and Hydrangea Sphinx moths. It can be used in butterfly gardens, as a naturalizing plant or to control erosion in difficult, moist areas. It’s great for naturalizing. To grow Buttonbush, select a fairly moist environment. As you might imagine it has a pretty high water requirement even though it likes shade to part shade. It is a spreading multi-branched shrub with an irregular crown which produces balls of white flowers resembling pincushions. As it can get a bit lanky, plants in a more formal setting might need to be pruned from time to time. It is a rapid grower and spreads by suckering. It is said to be hardy from Zones 5 to 11 although a number of plants do just fine in Zone 4. For Minnesota gardeners it might be wise to consider planting in a protected area and mulching in the fall at least for the first year or two. Getting a local specimen is also important. Buttonbush is an otherwise hardy ornamental perennial. It’s a native that is an attractive addition to any moist shady area. Photo credits: Jim Evans, Wikimedia Commons (1), C. Fannon, University of Texas (2)
- Valerie Rogotzke, Dakota County Master Gardener | DCMGV
< Back Know Your Resources “Hey, Siri, what’s the best kind of mulch for my garden?” This is a question often overheard in a plant center from someone trying to make a selection for their yard. And while Siri can give some options, one has to doubt the accuracy of the reply. Questionable advice can always be found somewhere, whether that’s from artificial intelligence or your neighbor’s second cousin on Facebook, but surely there’s a better way to get the most accurate and helpful answers! This article explains how you can find answers to many of your gardening questions from experts and based on research. Read on to learn how to find reliable answers to your gardening questions. Valerie Rogotzke, Dakota County Master Gardener For Dakota County gardeners, let’s get better acquainted with two websites: the U of MN Extension site and our Dakota County Master Gardener site. You can bookmark these on your phone, computer, or tablet—and I encourage anyone to do so. You can find hundreds of helpful articles, guides, books, pamphlets, and more, all available for free! Everything is backed by scientific research and all specific to our growing zone and climate. U of MN EXTENSION SITE: https://extension.umn.edu/yard-and-garden From this start page, you see several specific guides to get started in the garden and solve common problems. How-To Guides Growing Guides (starting a garden, composting, fertilizing, hydroponics, houseplants, and more) Pollinator Guides Growing Safe Food Soil and Nutrient Health (including information on how to get your soil tested to learn which fertilizers are best for it ) Watering Guides Landscape design Lawn Care (with calendars for when to seed, mow, and more) Find Plants Flowers (annuals, perennials, native flowers) Fruit Houseplants Native Plants Trees and Shrubs Vegetables Weeds (identify weeds and learn control strategies) What’s wrong with my plant? This helps you diagnose problems in the yard and garden caused by insects, diseases, or other issues. If, for example, your eggplants look strange in the vegetable garden this summer, look up eggplants in this guide to learn what the issue is and solve the problem going forward. Weeds Identify the weed in your lawn and find the best way to eradicate or manage it. Dakota County Master Gardener Volunteers : https://www.dakotamastergardeners.org/ On our local Dakota County Master Gardener website, you’ll find a calendar of local events as well as updates on our local projects and other gardening resources. You will also find dozens of articles on a variety of gardening topics (most articles previously found in the Garden Buzz monthly newsletter). You will find articles on what you might be doing in your garden monthly, good gardening tips, features on native and perennial plants and vegetables; recipes using vegetables or fruits from your garden, and tips to deal with problems in or related to your garden. There is a search box to help you find articles by topic. There is also a link to subscribe to our Garden Buzz newsletter. This is a great supplement to the statewide website. Information on Let’s Get Growing (our spring gardening expo) and the Annual Plant Sale in May is there, as well as a list of the farmers’ markets where our Master Gardener Volunteers will be, answering questions and ready to discuss home gardens with all who stop by. Other resources of note: Gardening Projects with Children This section has dozens of project ideas to do with the kid gardeners in your life! Projects are available for all seasons and incorporate science learning and art. Gardening Book Club Recommendations Looking for a book to read with your gardening club? We’ve got you covered with dozens of book reviews on horticultural topics. Finally, a last way to get information on gardening and the Dakota County Master Gardener projects going on all around you is to follow us on Facebook and Instagram . When the U of MN offers free webinars on pollinators or when a garden tour in our area pops up, we’ll be sure to let you know! Photo credits: Photo 1 for newsletter: Credit Paul Wood Photo 2, credit: U of M Extension
- Kristina Valle, Dakota County Master Gardener | DCMGV
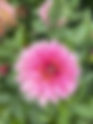
< Back Have a Sunny Garden? Try These Perennials Kristina Valle, Dakota County Master Gardener Do you have an area of your garden that receives 6 to 8 hours of sun each day? If so, you will want to plant “sun perennials” in that space. Perennials that prefer a sunny location should thrive in your yard, assuming, of course, that you provide them with healthy soil, ample water, and some tender loving care. Read this article for profiles of “sun perennials” for every season between the frost dates. Calling all sun worshipers! Since I have a north facing house position, my front yard is mostly shady. Most of the plant color in my yard is found in the back yard, where the southern light creates the perfect environment for my sun-seeking perennials to blossom. In this article I will feature my top 3 full-sun-perennials for each season, that will ensure a constant show of color in your garden from last to first frost. The plants featured below perform best in full sun, which is defined as 6+ hours of direct sunlight a day. Spring These early bloomers pop up in our gardens as winter gives way to spring, seeking out the sun that has already begun to warm the soil. Yarrow This is the most eager plant in my garden and the fern-like leaves are already pushing through the soil. I especially love this hard-working plant for its ability to choke out weeds which it succeeded in doing last year in a problem area of my garden. The plant comes in a variety of colors and heights that are sure to suit any color scheme or garden size. It is important to note, however, that it can be aggressive so plan carefully. Bloom Duration : early spring to late fall. Fernleaf Yarrow Creeping Phlox My rock wall signals the first colors of spring as the matted green leaves appear, giving way to bright, florescent shades of pink, purple, and white flowers. This is a great ground cover and can be tucked in between rocks in an alpine garden. You can get a second bloom later in the growing season by deadheading any spent blooms. Bloom duration : 3-4 weeks Salvia Perennial Salvia is a great addition to the garden if you want to support our early pollinators such as bees, butterflies, and hummingbirds. Salvia is a drought tolerant choice that holds steady through our dry spells. It needs at least 8+ hours of direct sunlight a day to thrive. Depending on the variety, this plant can range in size from 1’ to 5’, giving you multiple options for garden placement. To encourage multiple bloom cycles, trim off the spent flowers, or if it is under blooming, you can cut the plant back mid-summer to encourage more blooms. Bloom duration : 6-8 weeks in spring and then after a haircut, into late summer/fall. Summer By the time summer rolls around, the heat is reaching new heights and as we have seen in the past few years, rolling drought puts a lot of strain on our plants. Luckily, these sun-loving perennials are built to withstand some weather-related strain. Common Milkweed Beautiful and fragrant purple/pink poms top off THE host plant for the Monarch butterfly. Even planting one milkweed plant in your yard will help support future generations of this at-risk butterfly. Once hatched, the young caterpillars will feast on the leaves so be cautious using chemicals around this plant. Common Milkweed is best placed in the center or the back of your garden due to its height, which averages around 3’-5.’ The seeds pods should be collected at the end of the season to prevent reseeding. Bloom duration : June – September. Hardy Geranium - G. Rozanne If you are looking for a sprawling, prolific bloomer, this is your plant. The violet-blue petals persist through the heat of summer and into fall, attracting bees and hummingbirds. This low maintenance plant really pulls its weight in the garden, but if it starts to lag, you can prune it back mid-season to rejuvenate it. Stunning along a border, or in the garden where you can create a cascading effect. Blooming Duration : Early Summer – Late fall. Coneflower (Echinacea) A garden staple, the coneflower supports pollinators in spring and summer, and provides seeds to songbirds (like Goldfinch) throughout the fall and winter months. When choosing a coneflower, opt for a less showy bloom with a single blossom to attract more pollinators. Think of the center of the flower as a landing pad. If it is obstructed by a complex petal structure, pollinators may find the flower less attractive and move on in search of flowers easier to access. To ensure a long bloom season, deadhead the spent flowers to promote a second flush of blooms. Blooming Duration : July – September. Autumn Cooler temperatures are followed by fading flowers and the promise of garden cleanup before the snow flies. Luckily, the color show does not have to end. These plants will round out the year with their warm, vivid colors. Aster Aside from its striking color amid a dulling floral background, this plant plays a critical role in continuing the nourishment of late season pollinators. Great for filling out a space in the garden that is abundant in spring and summer bloomers, to keep the color rolling into fall. You can cut these down to the ground once the first frost arrives or wait until spring to allow birds to enjoy the seeds through winter. Blooming Duration : August – October Sedum As a member of the stonecrop family, Autumn Joy Sedum is unique. The taller varieties, which can grow up to 24”, have large succulent leaves and tight clusters of flowers that deepen to rose or salmon as the temperatures cool in the fall. This variety is perfect in a garden where spring and summer blooming flowers have faded. Creeping sedum is used as a ground cover and is well suited for rocky landscapes with dry soil conditions where it is harder to grow other types of plants. Blooming Duration : Late summer into fall. Autumn Joy Stonecrop Hardy Mums A true sign of fall, this beautiful plant comes in a multitude of colors and is prized for its late season blooms. It is important to note that there are two distinct types of mums: the “hardy mum” and the “florist mum.” “Florist mums” are typically found at the end of the season at grocery or hardware stores. They are not adapted to our winters and are mainly a short-lived decorative plant. A “hardy mum” may need to be sourced out of a catalogue or special ordered from your nursery and should be planted in the spring to encourage root establishment through the year. Once established, you will be rewarded with a reliable display of color into fall each year. Bloom Duration : Late summer – Late fall. It is important to remember that while there are many plants that are versatile in their light requirements, with the ability to exist in a range of sun exposures, plants do have a best sun exposure which should be adhered to as much as possible to ensure that your plant is in a space where it can reach its full potential. These sun perennials need full sun to perform their best and to delight you year after year. Photo Credit: Pixabay.com (All Creative Commons) (1), Mike Myers, Flickr.com (All Creative Commons) (2), University of Minnesota Extension (3), Stockbridge School of Agriculture ( UMass.edu ) (4), Penn State Extension; extension.psu.edu (5), Horticulture and Home Pest News; iastate.edu (6), UW Arboretum ( wisc.edu ) (7), PNW Plants ( wsu.edu ) (8), Illinois Extension (UIUC) (9)
- Shari Dugstad, Dakota County Master Gardener | DCMGV
< Back Gardening with Annuals Shari Dugstad, Dakota County Master Gardener Annual flowers are welcome additions to our yards because they add a wide variety of color to the garden. Unlike most perennials, annuals will often provide colorful flowers throughout the growing season in Minnesota. Planting these colorful gems can be a fun activity for every member of your family and something your whole family can enjoy. This article reviews how to find the best annuals and how you can grow them successfully in your garden. For more information about soil, fertilizing, watering and general care of Annual flowers are welcome additions to our yards because they add a wide variety of color to the garden. Unlike most perennials, annuals will often provide colorful flowers throughout the growing season in Minnesota. Unfortunately, annual flowers are not hardy in Minnesota and must be replanted each year. But planting these colorful gems can be a fun activity for every member of your family. So, let’s review how to find the best annuals and how you can best use them in your garden. There are numerous varieties of annuals to choose from and they are relatively easy to grow. But before buying your annual flowers, consider what you are looking for - size, color, full sun or shade, landscaping enhancement, pollinators, container appropriate, zone or just a favorite flower. Annuals that attract Pollinators If you are interested in annual pollinators to complement your perennial pollinator garden but don’t know where to start, take a look at this University of Minnesota Extension study of more than 30 annual flower varieties. The study found nine flowers that attracted the most pollinators: Music Box Mix sunflower (Helianthus anuus ‘Music Box Mix’) Lemon Queen sunflower (Helianthus annuus ‘Lemon Queen’) Summer Pink Jewel Salvia (Salvia coccinea ‘Summer Jewel Pink’) Purple Fairy Tale Salvia (Salvia verticilliata ‘Purple Fairy Tale’) Orange Fudge Black-eyed Susan (Rudbeckia hirta ‘Orange Fudge’) Prairie Sun Black-eyed Susan(Rudbeckia hirta ‘Prairie Sun’) Showstar Butter Daisy (Melampodium paludosum ‘Showstar’) Dakota Gold Sneezeweed (Helenium amarum ‘Dakota Gold’) Envy Zinnia (Zinnia elegans ‘Envy’) Click on the study, above, for more information about the characteristics of these annuals. For a longer list of annuals that can be grown in Minnesota, look at this list provided by the University of Minnesota Extension. Top Performing Annuals in Minnesota There are so many annuals to choose from and it can be hard to know which will grow best in Minnesota. Fortunately, the University of Minnesota Extension has conducted trials on various cultivars. You can find lists of the top performing annuals and their features in the flower trials between 2018 and 2024 here . Here are the top ten for 2024: Begonia x hybrida Adora Velvet Red Celosia plumosa Bright Sparks Bright Red bronze Leaf Coleus Premium Sun Crimson Gold Dahlia Virtuoso Pinkerific Impatiens x hybrida SunPatiens Vigorous Purple Kwik kombo Picnic in the Park Mix Lantana Shamrock Rose Gold Lobelia Heatopia Dark Blue Marigold Pretty Yellow Salvia Sallyfun Pure White Dahlia Virtuoso Pinkerific Annuals for Container Gardens Annuals for Container Gardens If you would like to grow annuals in containers, the options are endless. Container gardening provides opportunities to be creative, to experiment with different flowers, to plant flowers with family or children, to enhance your landscape and to add beauty to your garden. Containers are also great way for those who don’t have a yard in which to plant, to add color to their world Containers work great for small spaces like decks and patios. (Note, also, that perennials can be incorporated into your annual containers for an interesting look.) Enjoy the process with container gardening. Before you get started determine what container you will use. A container can be almost anything that will hold soil and has drainage. But the material that they are made of can affect how your plant will grow. Click on this article to learn about the benefits and variables of different kinds of containers. You also need to decide where the containers will be located. Do they need full or partial sun or shade? How big a container do you need? Selecting plants for your containers Will you combine plants or have a single type of plant in the container? If plants are combined, select plants that flourish in the same soil, and have the same watering and light needs. Determine plant size, shape and number of plants for various impacts in the garden - color, interest, complementary to the landscape. Consider the color of the pot that is being used in conjunction with plant selection. An easy way to design a container is to use plants that are ‘thrillers, fillers and spillers.’ ‘Thrillers’ are the focal point and are usually bright, tall plants. ‘Fillers’ are often round, mounding, lower growing plants that make containers look full like begonia, coleus, and geraniums. ‘Spillers’ are plants that hang over the side of the container, like calibrachoa, nasturtium, and sweet potato vines. your containers, here is an article to review. With a little bit of effort this spring, you and your whole family can enjoy the pleasures of annuals in your garden. A little research on your part can result in the best annuals for your yard. Photo credits: University of Minnesota Extension (1), Shari Dugstad (2-4)