Search Results
Results found for ""
- Carole Dunn, Master Gardener | DCMGV
< Back Forcing Flower Bulbs Successfully Need a little color in your home this winter? After all the holiday décor is stored away, forcing flower bulbs indoors is a great way to enjoy flowers, both for their color and fragrance, during the cold winter months. Carole Dunn, Master Gardener Forcing bulbs indoors is quite easy and does not require expensive materials. You will first need to choose some bulbs. Flower bulbs that are easy to force are: Grape Hyacinths, Daffodils, Hyacinths and Paperwhites. These can be found at most garden stores or purchased through catalogs and online. Chilling Prechill bulbs, such as hyacinths and daffodils. To do so, place them in a paper bag and store in the refrigerator for at least 6 weeks. Paperwhites and amaryllis bulbs do not require a chilling period. Forcing bulbs in water One of the easiest ways to force bulbs is in water. Find a vase or jar that will hold your bulb or bulbs in an even layer. Fill the container with water to just touch the base of the bulb(s.) You will quickly see roots forming. Once you see them, keep the water level below the bulb to prevent rotting. Keep in a cool. Dark place until you see an inch or two of leaf growth. Move the bulbs to a bright spot but avoid direct sunlight. Rotate the vase from time to time to keep the plant growing straight. Add water when needed but keep it below the bottom of the bulb. Forcing bulbs on stones If using a larger vase, creating a base of stones can help keep your bulbs above the water level. Some “stone” options are pea gravel, river rock, glass chips and marbles. Set the bulbs on top of the stones then add a few stones around each bulb to anchor them and keep from tipping. Do not cover them. Add water to reach the base of the bulbs. Add water as it evaporates, keeping the level just below the bulb base. Tip for Paperwhites Get your Paperwhites tipsy! Paperwhites tend to get a little floppy, to prevent this, when leaves are 1 to 2 inches tall, pour out the plain water in your vase and replace with a 1:8 alcohol-to-water solution. Do not over do it, too much alcohol can kill the plants. You can use vodka, whiskey or rum. The use of this mixture stunts the plant’s growth, keeping it compact and sturdy. Keep adding until it is done flowering. Follow these tips to enjoy bringing a little early Spring to your home. Photo credits: University of Minnesota Extension (1), Gail Maifeld (2)
- By Jessica Nguyen, Master Gardener | DCMGV
< Back Protecting Bulbs for Winter Autumn in Minnesota is the time to prepare your bulbs for next year’s growing season, whether that is tucking in your hardy bulbs for their winter sleep (and protecting them from foraging critters!) or retrieving your tender bulbs for indoor storage to spare them from the harsh cold. Read on to learn more about what to do this season for beautiful blooms next year! By Jessica Nguyen, Master Gardener Tubers, rhizomes, corms, and true bulbs are commonly referred to using the overarching colloquialism “bulbs.” Bulbs are underground storage structures that carry both the genetic material for a plant for propagation and a food supply to kickstart plant growth. Some examples of bulbs you might have in your garden are daylilies and cyclamen; irises; gladiolus flowers, crocuses, and freesias; daffodils and tulips. Autumn in Minnesota is the time to prepare your bulbs for next year’s growing season, whether that is tucking in your hardy bulbs for their winter sleep (and protecting them from foraging critters!) or retrieving your tender bulbs for indoor storage to spare them from the harsh cold. Read on to learn more about what to do this season for beautiful blooms next year! Know your plant: There are generally two routes for winterizing bulbs, depending on whether the bulb is hardy or tender. Hardy bulbs require the cold winter temperatures to kickstart biochemical processes necessary for their next bloom cycle. They generally bloom in early spring to early summer (think crocuses or daffodils. Crocuses are some of the earliest-blooming flowers that have a bulb structure underground (it’s actually a corm!) Tender bulbs can’t survive the cold temperatures and are planted in the spring to bloom during the summer months (e.g. dahlias, elephant ears, begonias, amaryllis.) Amaryllis hippeastrum Candy Floss In-ground hardy bulb overwintering: for that pleasant spring surprise! Hardy bulbs need the winter chill to flower in the spring, and should be planted in the fall in order to get that necessary cold cycle. Plant your bulbs according to the specific recommended planting depth and spacing for the plant, mark where you’ve planted your bulbs so you don’t forget about them, then watch and wait. Many hardy bulbs are perennials that you may have planted in previous seasons! For hardy bulbs that are already in the ground, trim away foliage in the fall after it has had plenty of time to die back naturally, clear away debris from the previous bloom season, cover the bulbs back up, and leave them be! Planting Crocus Bulbs You should water hardy bulbs up until the first frost, even if the foliage has died down. The wet soil helps to ensure the bulbs don’t dry out or wither before they are able to freeze for the winter. Hardy bulbs can survive the winter chill because even though the air temperature in Minnesota winters can reach incredibly low temperatures and can fluctuate wildly, soil temperatures can stay much more consistent at just below freezing. At these temperatures, moisture in hardy bulbs freezes without damaging the cells of the plant. It is important, therefore, to plant your bulbs at the appropriate depth, to make sure that they are under enough soil to appropriately buffer against the winter cold. See this article by Dominic Christensen on soil temperatures during winter and the buffering effects of snow. Sometimes, bulbs will emerge prematurely due to random periods of warmer weather in late winter, damaging tender growth of the bulb when the temperatures eventually dip back below freezing. For areas that are subject to freeze-thaw cycles (think, that weird February-March time when it is 70℉ one week and -30℉ the next) covering the soil with a 6-inch layer of mulch or straw will protect the bulbs from moisture and temperature fluctuations. Container gardens are more susceptible to freeze-thaw complications, so a protective layer is a must. Critter considerations for bulbs left in the ground: No matter how busy we gardeners are as we prepare our gardens for the winter months, critters are even busier foraging for food to bulk up before the snow falls. There are a couple of ways to keep animals from nibbling on bulbs in autumn, such as: ● Using physical barriers such as row covers, wire mesh, or cages around your bulbs to prevent animals from accessing them. For gardens susceptible to animal attacks from underground, lining the interior of your planting area with a barrier of wire mesh before burying bulbs, may offer protection. Just make sure that the material that you use has openings large enough such that root production of the bulbs is not hindered, while still small enough to block underground wildlife. ● Utilizing planting practices such as mixing in crushed stones into the dirt when you plant your bulbs to deter digging and chewing. ● Hiding evidence of bulbs by clearing away debris from dead foliage; or, by covering newly planted bulbs with a groundcover plant or a layer of mulch. ● Planting only bulbs that are unappetizing to critters, or mixing in your desired bulbs with bulbs that are unappetizing. Some examples of bulbs that animals tend to avoid are daffodils[1] , alliums[2] , hyacinths[3] , grape [4] hyacinths (Muscari varieties,) squills[5] , and snowdrops[6] . TLC for tender bulbs: Many varieties of bulb plants cannot survive our severe Minnesota winters. Some examples of tender bulbs include canna lilies, calla lilies, and caladiums. Dig these bulbs up in the late fall before the first frost, but after the greenery has died off naturally (important for allowing the bulb to gather energy for its next blooms!) They should be stored indoors in a cool, dry place. For these bulbs, avoid freezing temperatures, which can damage the cells of the bulb. It is important to also avoid excess moisture, which can cause mold and rot, while allowing the bulbs to stay plump and retain enough water to survive the duration of storage. Dig up your bulbs and spray or brush off soil that clings to the bulbs. This is important: dry or cure your bulbs for three to seven days at room temperature in an area with plenty of airflow to remove excess moisture before storage. When you touch the cut end of the stem coming out of the bulb, it should feel dry. Otherwise, continue to cure the bulbs. Optional: dust with an antifungal. Store only large, healthy bulbs, as damaged bulbs may not survive storage or may invite rot, and smaller bulbs may dry up before spring. Store bulbs in a container that allows plenty of airflow, such as a wicker basket, or a mesh bag. Bulbs should be stored at an average of 40 degrees without freezing, such as in a cold corner of a basement, a warm fridge, or a temperature-controlled garage. Check on your bulbs periodically (at least once a month) to remove any rotting or molded bulbs, as one bad bulb can spoil the whole batch! https://www.pexels.com/photo/yellow-daffodil-flower-on-brown-soil-8259616/ https://commons.wikimedia.org/wiki/File:Allium_aflatunense_%27Purple%27_5_2021_ornamental_onion-_%2851187451616%29.jpg https://pxhere.com/en/photo/995895 https://www.pxfuel.com/en/free-photo-xizda https://www.flickr.com/photos/pavdw/17160679352/in/photostream/ https://commons.wikimedia.org/wiki/File:Common_Snowdrops_%28Galanthus_nivalis%29_%2825742401103%29.jpg Photo credits: University of Minnesota Extension (1,5), Creative Commons Crocus , Anatomy (2), en.wikipedia.org , all creative commons (3), www.wilsonbrosonline.com , all creative commons (4)
- Shari Mayer, Master Gardener | DCMGV
< Back Harvesting and Preserving Herbs Harvest time is such a fun time of the year. There are so many herbs to harvest and preserve for the upcoming winter months. Some share their bounty year after year, like tarragon and oregano, and others, like basil and marjoram, are planted in spring for a fall harvest. Shari Mayer, Master Gardener I’m always playing with herbs in my yard, tucking them into the landscape, my gardens, and containers. Wherever they end up, as fall approaches, my attention turns toward harvesting. I’ll share a couple of harvesting techniques that have worked well for me over the years. Personally, I tend to wait as long as possible before the final harvest. Oftentimes I find myself gathering armfuls of herbs to bring indoors in a race against inclement weather, especially my frost-sensitive herbs. Looking at mountains of plant material all over my kitchen counters and in buckets makes me sometimes wonder what I was thinking way back in the spring! Anyway, here are some techniques that help me prolong the fresh herbs for cooking and make short work of processing. These methods preserve the flavor and essential oils, which is what it’s all about. First, prepping for harvest is important. I don’t like to waste an enormous amount of time washing and drying herbs once they are inside, so I try to use the gift of rain. This washes the majority of dust, dirt and debris from the herbs. It also ensures they are hydrated just prior to harvest. If no rain, then I achieve the same effect with a garden hose. My favorite way to process a lot of herbs is what I refer to as the ‘slurry’ method. I’ll use basil, since it is a perfect example. Basil does not like temps below 50 degrees F, and discolors to an unappetizing brown if cold and wet. This method preserves the color and makes it super simple to use in cooking. The key to a slurry is the ratio of fresh, packed herbs to oil. Use a 4:1 ratio. The process is simple. Two cups packed leaf material and ½ cup oil (my favorite is olive). Do not use woody stems. Using a food processor, start pulsing the leaf material, and slowly add the oil until incorporated. The mixture should be thick and pourable, but not runny. Fill ice cube trays and freeze the mixture. Once frozen, store in freezer bags. I mark the bags with ice cubes that equal 2 cups of herbed cubes. This is the base amount to make one recipe of pesto. If you want to make a pesto, just thaw, and add the remainder of pesto ingredients to it. Otherwise, for cooking, just pop an ice cube or two as needed or desired. The slurry method works well also with water as an oil substitute. Another favorite technique of mine is to make herb bouquets. I just go outside and collect herbs as you would cut flowers, and bring them in and arrange the herbs in vases. If the herb is annual, such as basil, I will cut it right at the ground level and bring the whole plant inside. If it is a perennial, such as tarragon, then just bring in a number of branches. They last for weeks this way, and provide fresh herbs for your cooking well into fall. I find the varied greens of the herbs are as beautiful as flowers. There are so many ways to preserve herbs, but these are a couple of my favorites. Here’s to fall bouquets of green! Photo credits Emily Murphy, “ PassthePistil.com ” (1), University of Minnesota Extension (2, 3, 4)
- Sarah Heidtke, Master Gardener | DCMGV
< Back Glorious Amaryllis Amaryllis is a beautiful plant with large, stunning blooms that can be grown as a houseplant year-round. Get ready for some beautiful inside blooms and learn all about growing Amaryllis this winter. Sarah Heidtke, Master Gardener Amaryllis is a beautiful plant with blooms averaging 4 to 10 inches and can even be grown as a houseplant year around. Get ready for some beautiful inside blooms and learn all about growing Amaryllis this winter. My summer flowers are faded with the first frosts of fall, and the spring bulbs are planted and resting before their show in a few months. It’s about this time of year that I start to really think about Amaryllis. Amaryllis bulbs and blooms start appearing more frequently in stores with their holiday shades of red, pink, white and more - ready to keep us flower gardeners happy with blooms inside while the cold Minnesota weather settles in. Amaryllis are native to warmer climates. The bulbs we generally see for purchase as houseplants in our part of the world are hybrids of the genus Hippeastrum , and are native to Central and South America. Let’s talk about how to grow these beauties here in Minnesota. Growing Amaryllis Amaryllis grow best in narrow containers - about 1 inch diameter wider than the largest part of the bulb, and twice as tall. Soil should be able to drain freely from container - Amaryllis do not like to sit in water and can rot if left too wet. One third to one half of the bulb should still be visible above the soil, and the bulb should sit up over the edge of the container. Water thoroughly after planting and allow the water to drain. Then water only when the top 2 inches of soil are dry to the touch. Place the pot on a saucer in a sunny window until flower buds begin to open, then move the plant out of direct sunlight. Keep Your Amaryllis Plant Healthy and Flowering for Years Amaryllis can be grown actively all year, and, with some care, will continue to rebloom. Once the flowers are finished blooming, snip them off so the plant doesn’t put energy into creating seed pods. Let the green foliage continue to have sunlight so the bulb can store energy through photosynthesis. Unlike some bulbs, Amaryllis does not require a dormant period in order to bloom and rebloom. However, you can try to time blooms by allowing the plant to go dormant in a cool, dry, dark location for 8 to12 weeks without water or feeding. Then bring the plant out into a sunny place and resume normal watering and fertilizing with a high phosphorus content (about half the strength the package recommendation) and expect blooms in 4 to 6 weeks. Potted Amaryllis can also be taken outside in Minnesota during warmer months. They will need to gradually spend time outside to acclimate to the outdoors, and then find a location with at least six hours of sun. Just set the pot out in a sunny spot, or stick the whole pot into the ground in the garden. Amaryllis will not survive frost or freezing temperatures, so they will need to be brought back inside before cold temperatures arrive. It is not necessary to repot Amaryllis plants from season to season. In fact, they prefer to be somewhat potbound for the best blooms. The best time to repot Amaryllis plants is after they’ve gone through a dormant period, and then they will likely only need to be repotted with fresh sterile soil about every 3-4 years. For more information on Amaryllis, and many more houseplants, check out the University of Minnesota - Extension website . Happy Growing! Photo credits: Sarah Heidtke (1, 2, 3, 4), University of Minnesota Extension (5, 6)
- Gail Maifeld, Master Gardener | DCMGV
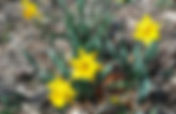
< Back Growing Daffodils Sometimes referred to as narcissus, daffodils nodding yellow, white, or variegated heads, are true harbingers of spring. Daffodils are a colorful addition to your garden with few basic steps. Gail Maifeld, Master Gardener How do daffodils grow? Daffodils are a spring-flowering plant that grows from a bulb planted in the fall. In spring the bulbs send up leaves that form buds, each of which develops into a flower or two depending on the variety. The outside of the flower is known as the perianth. This can be a different color than the inside trumpet or corona. Beneath the ground the bulb absorbs nutrients manufactured by the leaves after flowering, which can go on for 7 weeks or longer. The leaves fade, drop to the ground, and the plant goes dormant. Cut the leaves off only after they have fallen to the ground and are brown. Where can daffodils be planted for success? Daffodils do best in full sun, although they can tolerate some shade. If planting under a tree, consider removing lower branches to allow for light. Daffodils require well-drained soil. Rocks or clay soil should be removed and replaced with a mix of quality soil, which should be 1 part peat moss and 2 parts soil. Dig up an area to the depth of 12 inches. Using a shovel loosen soil at the bottom of the trench or hole. Mix new soil into the bottom to create a bed of loose soil for the bulb roots to form. Fill the opening to 8 inches and arrange the bulbs 3-4 inches apart with the wide end of the bulb down and gently press into the soil. Gently cover with soil and water. A 10-10-10 commercial fertilizer or organic fertilizer such as bone meal, blood meal or cow manure can be added. Where can I buy daffodil bulbs? Garden centers, online retailers, and mail order garden catalogs are the usual sources. Bulbs that have a soft base, dark brown or black coloring should not be purchased. Look at the mail order bulbs carefully and return any that are bad. Plant the bulbs as soon as you purchase them or receive them in the mail. Bulbs are alive so heat and humidity can cause damage. Reputable dealers will have the bulbs in a cool well- ventilated area. Mail order catalogs will ship during your areas best planting period, which is mid August thru September. Bulbs need 10-12 weeks to from roots so early October is the latest time to plant. How do I care for daffodils? Water newly planted bulbs frequently during the fall. Gardeners frequently forget to water, which is needed for root development. If spring rains are not adequate, begin watering. Cut back on watering as the foliage fades. Buds begin developing on the bulbs; so begin watering in late summer and continue through the fall. Mulch prevents weeds from growing around the bulbs but if the bulbs are naturalized, mulch is not practical. Fertilize in the spring before new growth appears. Avoid touching new growth with fertilizer and water immediately after the application to wash the fertilizer down to the roots. Daffodils do not need staking but deadheading will result in a more attractive bed. Daffodils are generally insect and disease free. Daffodils make a colorful early spring bouquet. Some are sweet scented. Harvest the flowers just as the bud begins to open and place immediately in water. Do not mix daffodils with other flowers since daffodils release a slime that is toxic. For long lasting bouquets add 5 drops of bleach to the water. With a minimum of garden preparation and plant maintenance, daffodils will reward the gardener with colorful spring joy.
- Home | DCMGV
Friendly Master Gardeners ready to answer your toughest gardening questions can be found at Farmers Markets in Eagan and Apple Valley at 2024-25 winter markets. A complete listing of dates, location and times can be found on our Event Calendar . Gardening Problem or Questions? Garden Information Ask a MG Ask a Master Gardener Extension Yard & Garden Extension Yard & Garden Garden Information 1/3 Upcoming Events View All Events Get the Buzz Don’t miss out on the Garden Buzz, the Dakota County Master Gardener’s monthly newsletter bringing you interesting, timely, research-based information on best practices in consumer gardening and caring for the environment. Monthly gardening tasks Master Gardener events Plant diseases, insects or other garden problems Tips to enhance your garden and the environment; Ideas for sharing the joy of gardening with the children in your lives Recipes, gardening books and much more! Subscribe Now
- Patricia Johnson, Dakota County Master Gardener Intern | DCMGV
< Back Spring in September Plan Now to Start 2025 Blooming in Color Spring begins this month! I know, it’s September, but on a gardener’s calendar, this is the month to begin planning for an awakening of eagerly blooming sprouts and a palette of spring colors. Whether you are a “bulb-beginner” like me or a bulb enthusiast looking to expand on some gardening ideas, continue reading as we discuss the what, where, when, how, and why of spring blooming bulbs with a few design tips planted along the way. Patricia Johnson, Dakota County Master Gardener Intern September marks the beginning of fall and so it’s time to start planting. What? Spring bulbs, of course. Sure, you may be a bit weary of gardening this time of year but before you put your gardening tools away, take out that trowel one last time and plant some spring bulbs. Why plant spring blooming bulbs? After a long Minnesota winter, the flowers of spring bulbs provide a great wealth of color in a variety of flower and leaf designs - an unabashed welcome to spring against the monochromatic color of the final days of winter. When? There are different kinds of bulbs. Spring blooming bulbs are planted in the fall of the previous year. Summer blooming bulbs are planted in the spring of the same year. This article will only focus on spring blooming bulbs, also known as hardy bulbs. Examples of hardy bulbs are tulips, daffodils, iris, crocus and lilies. The local garden centers will have a selection of spring blooming bulbs beginning this month. Now through October is the ideal time when you should plant these bulbs (although they can be planted until the first frost). Make sure the bulbs are clean and solid, without mold, rot, cuts and bruising. When healthy bulbs are properly planted and cared for, spring blooming bulbs will give you years of enjoyment. Tulip, daffodil, crocus bulbs Before you plant your spring bulbs, consider where to plant them in your garden. Begin by taking pictures of your flower gardens throughout the seasons and take note of the sun and shade exposure throughout the days. This will help you determine what to plant and where to plant your bulbs as your existing plants progress through their own unique life cycles. Pictures will also aid in determining what plants to thin out and what plants to transplant along with spacing when the time is right. My annual red petunias had a happy southwest-facing summer taking a front row seat to my colorful perennials but will soon relinquish their small plot of soil. My bountiful hydrangea and Black Eyed Susans, swaying feather reed grass, and my prickly Japanese barberry will then become a beautiful backdrop to groupings of snowdrops and allium . Both will be the ideal height ranging from three to eight inches. (Note that there are different sizes of allium ranging from short to quite tall, so look closely before you buy.) Snowdrops will bloom as early as March and allium will follow in May giving time for their surrounding neighbors to grow into full fruition, blooming in all their glory from June through fall. It is always important to read the packaging to know how to plant the bulbs. Planting depths may range from three inches to twelve inches. According to the University of Minnesota Extension, “[g]enerally, plant bulbs two to three times deeper than their diameter. This will vary with the type of soil.” If you want to do advance soil preparation, do a soil sample test of the area you will plant your bulbs. Keep in mind that the turnaround for results may take up to three weeks, so plan accordingly. This will give you time to shop for bulbs. After you have evenly spread the final layer of soil, watered thoroughly, laid chicken wire to ward off hungry squirrels and other wildlife, spread a layer of mulch, and labeled your plantings, take one final picture. Document your work so you can relish in the before and after pictures come next spring. During the stillness of the upcoming holiday months, you will be free to consider your color theme for annual hanging baskets or planters for the upcoming year ahead. You can also explore the possibility of summer blooming bulbs as you await with anticipation your spring bulbs in blooming color. REFERENCES: https://www.dakotamastergardeners.org/annualsbulbs/bulbs-101 https://extension.umn.edu/how/planting-bulbs-tubers-and-rhizomes https://soiltest.cfans.umn.edu/ https://www.youtube.com/watch?v=TTXODhmkJS0 Photo Credit: University of Minnesota Extension (1,2,4,5), Patricia Johnson (3)
- Carolyn Plank, Master Gardener | DCMGV
< Back Early Spring Blooming Plants Deep in the doldrums of winter, everyone is anxious for spring weather to arrive so that, once again, they can dig in the dirt planting flowers and vegetables. To entice us even more, we’re seeing bulb plants in the stores for sale so we can enjoy them at home until spring finally arrives. In this article, I’ll talk about some of the most popular spring blooming plants for your garden. Carolyn Plank, Master Gardener Deep in the doldrums of winter, everyone is anxious for spring weather to arrive so that, once again, they can dig in the dirt planting flowers and vegetables. To entice us even more, we’re seeing bulb plants in the stores for sale so we can enjoy them at home until spring finally arrives. In this article, I’ll talk about some of the most popular spring blooming plants for your garden. CROCUS is one of the first bulb plants to peak its head up in early spring. They are a very reliable plant and frost tolerant. They grow 3-6” tall and are available in multiple colors in shades of purple, orange, pink, and white. They like full sun to part shade and prefer a slightly neutral soil pH of 6.0-7.0, but well-draining soil is very important. DAFFODILS are also an early spring plant best known for their bright yellow trumpet shaped flower. They grow in clumps and unlike tulip bulbs, they have little appeal to wildlife. Planting them amongst snowdrops, hyacinths and tulips provides a wonderful array of colors. They tolerate full sun to part shade with a slightly neutral pH soil (6.0-7.0). DWARF IRIS is a fragrant miniature plant that blooms early in the season and grows to about 6-8”. They bloom in two waves in various shades of dark to light blue, and purple making them ideal for borders. They prefer full sun to part shade, good soil drainage, and spread through underground rhizomatous stems filling the garden with beautiful spring blooms. HYACINTH loves full sun to part shade in a well-drained soil with pH close to neutral (7.0). This plant is well suited to Zones 4-8 and range in height from 6-12”. This plant has a very fragrant flower with tiny blooms resembling bunches of grapes. TULIPS bloom early in the spring season along with daffodils and crocus. They do best in full sun and well-drained soil with a pH of 6.0-6.5. Colors include orange, pink, purple, red, white, yellow and numerous multi colors that grow to 12-18” tall. EASTER LILY – Lilies are very flamboyant with beautiful flowers and an intensely sweet fragrance. Easter lilies are white in color although there are numerous types of lilies such as Asiatic and Oriental hybrids that come in many colors. The lily is an upright perennial that ranges in height from 2-8’ tall. Don’t forget, once that easter lily is done blooming, cut the stems down and plant the bulb in the garden so you can enjoy it again next spring. Lilies grow best in slightly alkaline (6.5-7.0) moist, well-drained soil high in organic matter. Fall is the time to plant the bulbs for most of these plants, so, if you haven’t planted any of these spring delights in your garden yet, I hope you are inspired to do so this year. Then look forward to a rainbow of color in the spring. Photo Credits: Carolyn Plank (1), University of Minnesota Extension (2), Julie Weisenhorn, University of Minnesota Extension (3), Woodies Garden Goods (4 - Creative Commons License) (4), Pixnio (Creative Commons License) (5), MaxPixel (Creative Commons License) (6)
- Marjorie Blare, Master Gardener | DCMGV
< Back The Ws (plus an H) of Bulbs The great thing about planting bulbs is that they will bloom year after year. Here's what you need to know to grow bulbs successfully in your garden and look forward to early spring color. Marjorie Blare, Master Gardener Who should plant bulbs? You! Why plant bulbs? Bulbs can provide color all in all three seasons and many bulbs will return year after year. Most bulbs prefer full sun but some bulbs even thrive in shade! What are bulbs and what kinds to plant? What we loosely call bulbs are actually a group containing: true bulbs (Tulips, lilies), corms (Crocus), rhizomes (Callas, Iris) and tuberous roots (Dahlias, Tuberous begonias). All of these plants have a self-contained food storage system that has adapted to living underground. Bulbs are either hardy (perennial) or tender (need to be dug and stored) and this will determine where you plant them. Most people are familiar with Tulips, Daffodils and Lilies. All of these come in early, mid-and late season, as well as short medium and tall. There are a host of small bulbs that are often overlooked. Many of these will grow well in areas under trees because they flower before the tree leaves out. Where should I plant bulbs? Most bulbs should be planted in full sun. They don't like wet feet. Most bulbs will do well in soils ranging from sandy to clay. Jack-in-the-Pulpits, Trillium, Tuberous begonias and Martagon lilies are bulbs that will grow in the shade. How do I plant bulbs? Dig a hole two to three times deeper than the bulb's circumference. Amend the soil with organic matter. You may have heard of putting bone meal in the hole, don't do this unless you have a soil test ( https://soiltest.cfans.umn.edu/ ) that shows your soil needs calcium and phosphorous. According to the University of Colorado, bone meal will only be available to plants in soil that has a pH level of 7 or lower. Dakota County soils tend to be naturally high in phosphorous. Make sure to plant bulbs deeper if your soil is sandy. Putting a wire barrier over the bulbs may deter digging critters. It is recommended to plant odd numbers of bulbs for aesthetics. Smaller bulbs can be planted on top of larger bulbs, rather like a fruit cake. When do I plant bulbs? Bulbs can be planted from late September through late October in Minnesota. If you are dividing bulbs, wait for the foliage to dry, but you can move them immediately. Some bulbs, such as lilies, can be moved “in the green”, as long as they are done blooming, and are taken care of through any dry, hot weather. If you wish to overwinter tender bulbs, plant them where it will be easy to dig them in the fall. For more information go to https://extension.umn.edu/how/planting-bulbs-tubers-and-rhizomes For information on growing bulbs indoors go to https://extension.umn.edu/planting-and-growing-guides/growing-bulbs-indoors . Happy Planting! Photo credits: Carolyn Plank (1), Deborah Snow (2), University of Minnesota Extension (3)
- By Kristina Valle, Master Gardener | DCMGV
< Back Overwinter Geraniums the Correct Way As the end of the growing season appears it may be sad to think of your beautiful geraniums’ endless show of color coming to an end. Fear not! While non-hardy geraniums are considered annuals, overwintering your prized plant indoors can carry them through to the following year, giving you a jump start on spring and saving you some money if you usually replace them each year. But beware – it’s not quite as simple as carrying your geranium pot inside and waiting for spring. This article talks about two ways to overwinter geraniums in a way that will maximize your chance of success. By Kristina Valle, Master Gardener It’s never too early to start thinking about final garden projects as we near the end of our growing season. Sad to think of your beautiful geraniums’ endless show of color coming to an end? Fear not! While non-hardy geraniums are considered annuals, overwintering your prized plant indoors can carry them through to the following year, giving you a jump start on spring and saving you some money if you usually replace them each year. But beware – it’s not quite as simple as carrying your geranium pot inside and waiting for spring. This article talks about two ways to overwinter geraniums in a way that will maximize your chance of success. Overwintered geraniums are an early memory of mine. I distinctly remember running down the basement stairs of my grandparent’s home and being struck with the scent of the potted geraniums, lined up across the west facing window; the vibrant colors, a welcome contrast to the bright white winter landscape outside. There are two main ways to overwinter your geraniums, both of which need to be done before the first frost: Potted While my grandparents chose to keep tending to their geraniums through the winter months in their original pots, you might keep your geraniums in planters or heavy pots that would be impossible to move indoors. If you want to keep the plants potted, you can transplant them into smaller indoor pots by carefully digging up the root ball, and replanting into the pot of your choice. Before bringing the plant indoors, check for any pests trying to hitch a ride and remove any dead leaves. Now is also a good time to trim back any dead stems. Place your potted plant in front of a bright window or under florescent lights, and water every 1-2 weeks once the top of the soil dries out. Bare Root The enemy of the bare rooted geranium is moisture. That said, you have two options when you are ready to pull your geraniums in for the winter: 1) you can wait for the soil to dry out before digging up the root ball, or 2) you can dig the root ball out of the soil, tapping off any remaining dirt and then let your plant sit out for a day or so to ensure that all excess moisture has evaporated. As with your potted geranium option, be sure to inspect your plant for any pests and cut away any dead leaves, buds or flowers. The objective for this overwintering method is to encourage the plant into dormancy and not spend any energy into supporting existing or new growth. You also have a few housing options for your plant: 1) paper bag (think landscape or grocery), 2) cardboard box or 3) tied up at the root to hang upside down. Each of these options ensures good ventilation which is critical to help ward off excess moisture and darkness, which will lull the plant into dormancy. Place your bag or box in a cool dry location such as a basement, root cellar or shed – anywhere where temperatures will remain around 55-65 degrees. Check on your plant about once a month to inspect for mold or other disease and manage as needed. Getting Ready for Spring – Breaking Dormancy About 6-8 weeks before the last frost day, inspect your plants and trim them back by one-half to two-thirds. Don’t be alarmed if your plant has lost many or all of its leaves. Plant the geranium in a pot, give it a good watering and set it in front of a bright window. Patience and care should generate the first signs of growth in the coming days and weeks and by time the risk of frost has passed, you’ll be weeks ahead of any store-bought geraniums available to gardeners. Photo credit: University of Minnesota Extension (1)
- Valerie Rogotzke, Dakota County Master Gardener | DCMGV
< Back BULBS 101 Snowdrops and daffodils are harbingers of spring, the first flowers to appear after the snow has melted and the days start to lengthen. For many of us, these early bulbs are a wake-up call, reminding us that the growing season is beginning. Of course, if seeing daffodils makes us want them in our own gardens, it’s too late for this year! For many Minnesota gardeners, bulbs have been in our yards for decades. However, if you’re new to bulbs or would just like a more in-depth look at them, this Bulb Primer is for you! Valerie Rogotzke, Dakota County Master Gardener Not all bulbs are bulbs: Understanding the different types: True Bulbs, Corms, Tubers, and Rhizomes Not all of what we home gardeners call bulbs are—technically speaking—bulbs. Horticulturists identify different structures for different flowers, and these terms highlight the great variety we find amongst our favorite flowers. A true bulb has a plate from which roots will shoot, and is made up of several scales or layers like garlic bulbs that contain nutrients for its growth. True bulbs include daffodils, alliums, hyacinths, and tulips. Corms, like crocuses and gladioli, have a similar plate of roots, but no scales; they are a solid, compressed food storage unit. Tubers, like dahlias and begonias, bud from an enlarged rootlike structure which multiplies underground like potatoes, while rhizomes, like canna lilies and lily-of-the-valley, are horizontal structures that look like swollen stems. The horticultural name for bulbs—for all true bulbs, corms, rhizomes, tubers —is geophytes. It’s fitting, as “geo” means “earth” and “phyte” means plant. These plants of the earth all have underground storage organs from which they will grow. Hardy versus Tender Much like Minnesota retirees, the most important distinction amongst geophytes is where they will spend the winter. Do they like the cold or will they need warmer weather? Hardy bulbs are tough enough to survive outside in the wintertime. In fact, that cold snap is vital! Because of this, hardy bulbs are planted in autumn and will bloom for the first time the following spring. Hardy bulbs are often the first flowers to appear in spring: snowdrops, daffodils, crocuses, alliums, and more. They must be buried to the appropriate depth, and in an area with good drainage. Although hardy bulbs can stay in the ground indefinitely, they do require some maintenance. Every 3-4 years, hardy bulbs may need to be dug up and divided to prevent overcrowding. Tender bulbs are too delicate for winter and must be removed from our gardens before a frost sets in. Stored indoors during winter, they can be planted again in late spring for late summer or autumn blossoms. Canna lilies, begonias, freesia, gladiolus, and dahlias are amongst the most popular tender bulbs. Learn how to care for bulbs and rhizomes over the winter to prevent problems and rot. Take care when digging up bulbs, clean the soil from them gently, and in some cases, let them cure for a week in the sunlight before storing them in paper bags out of the light during winter months. For more information, read this article from the U of M Extension. If you want to plant hardy bulbs, you will have to wait for the fall. But you can still plant tender bulbs this spring for enjoyment during the summer. Resources: U of MN Extension: Planting Bulbs, Tubers, and Rhizomes. https://extension.umn.edu/how/planting-bulbs-tubers-and-rhizomes#soil-preparation-1410662 University of FL: Geophytes. https://propg.ifas.ufl.edu/07-geophytes/01-bulbs/02-geophytes-bulbs.html Photo Credits: U of M Extension (1,2), www.flickr.com (3)
- Jim Lakin, M.D., Master Gardener | DCMGV
< Back Zinnias: Vibrant Accents to a Northern Garden You know that zinnias provide a beautiful flourish to the summer garden. The varieties and colors are endless and can be enjoyed from late Spring into the Fall. But did you know that growing Zinnias from seed is both easy and rewarding? Read this article to learn why you might want to grow your own zinnias from seed this year. Jim Lakin, M.D., Master Gardener Not every seed is created equal. Trying to get some of the native perennials to germinate seems to require an Act of Congress. And they’re gridlocked! Not so with the humble but glorious zinnia. In my book, zinnias are some of the most overlooked yet rewarding annuals a Minnesotan could hope for. Although originating in Mexico and the Southwestern U.S., varieties have been developed all over the world. Yet they all still retain their love of warmth and sunlight, a commodity sometimes in short supply up here. Fear not! Simply sew zinnia seeds after the last hard frost and bide your time. As things warm up the seedlings will take care of the rest, producing blooms from late spring, far into the fall. If you have a warm sunny spot inside, you might even consider starting some seeds four to six weeks before the last frost. Unlike some more persnickety plants, zinnias germinate readily. You can set them out in the garden when they get two to four inches tall and enjoy weeks of blooms before the seeds you sewed get in gear. There are many varieties of zinnias ranging in height from 6 inches to 4 feet. I like the older, smaller blooms. They are hardy, fast growing, and tough plants. As I said, they do need full sun and warmth, but ask little else. One fertilization a season usually suffices. They are quite disease resistant. Powdery mildew seems to be the only common malady. It doesn’t look very attractive, but the plants usually survive. To keep them happy and mildew free, select a well-drained location for planting. Zinnias don’t like their feet wet. Mixed zinnias in full summer bloom If you find a variety you really like, consider collecting seeds in the late fall. Just cut off the spent flowers, shake out the seeds onto a sheet of paper, slip them into an envelope and store in the fridge until early next spring to start indoors or sew in the garden a bit later. Either way you will have bold, bright colors to cheer you through the gardening season! Late fall zinnia seed heads ready for harvest Want to learn more about zinnias than you thought there was to learn? Try Eric Grissell’s new book, A History of Zinnias: Flower for the Ages , Perdue University Press, West Layette, IN, 2020. Photo credits: Jim Lakin (1, 2)