

Raspberry Delights
Joy Johnson, Master Gardener
Yes, it’s December and there probably isn’t anything growing in your garden right now, since you live in Minnesota. But not that long ago you may have had a bumper crop of berries that are now in your freezer. Here’s a fresh idea for strawberries, blackberries, gooseberries, and raspberries.

I love raspberries. After all what’s not to like? (Don’t answer that. They do have thorns, but I can overlook one minor flaw). They are sweet and sour all at once, have a fresh fruity fragrance and come in a variety of colors and flavors. And most important, they have seeds that stick in your teeth, which gives you a really good excuse to chew on a toothpick – something my mother never let me do. She said I was going to trip and fall, and it would go through the roof of my mouth (which has never happened).
I grow a variety of raspberries. Most of my plants bear red berries that all get ripe within a 3 to 4 week period in the middle of July. I also have a few black raspberries, which are so little and sweet, it’s an absolute delight to eat them fresh off the bush. My golden raspberries are deer magnets, so last spring I moved them all into the end of my fenced-in vegetable garden where the deer and rabbits can’t eat them. They ripen all season long. Note - they do not work well for the recipe below because their golden color turns to brown when heated.
Last July, my brother and his family were visiting from Oregon. I was watching the kids for the day while mom and dad had a break. The raspberry bushes were loaded with raspberries ready for picking, so I marched the kids down to the patch to pick with the promise that we were going to make raspberry treats, IF we could pick enough berries. With this motivation, they grabbed buckets and followed me down. They were so excited to see all of the berries and eagerly started picking. Suddenly, “Auntie, what’s this?” and “Oh yuck”, then, “Auntie, there are bugs everywhere!” The bushes were covered with Japanese beetles. They were devouring the raspberry leaves and even some of the berries. I said, “This is war, show no mercy!” They looked askance at me. “Don’t let the invaders destroy my berry patch!” I commanded. “Can we just flick them off?” my niece asked. “No, that doesn’t do any good they will just come right back.” Then I told them to do what I usually do, “You have to pinch their heads until you hear a satisfying crack.” I nearly caused a stampede back to the house with those instructions. So, I quickly changed to a softer approach, “here’s a bucket with soapy water in it, brush them into them into it or shake the branch over the bucket.” That was something they could do.
We divided our team into 2 bug brushers and 3 berry pickers. In no time at all we had a couple of buckets full of berries, plenty for Raspberry Tarts (see that recipe in the Master Gardener Cookbook, for sale on our website) and Raspberry Stars. We gently washed the berries and then mixed 2 cups of them with 2 Tablespoons sugar, and 2 tablespoons corn starch dissolved in ¼ cup of water. The rest of the berries were divided between some for freezing and some for eating fresh. Then we made the Raspberry Stars. They are best eaten when still warm out of the oven. They don’t keep, so we took one for the team and ate all 18 of them with tea! They also make a beautiful Christmas morning pastry because of their color and shape. A light dusting of powdered sugar gives a snowy touch. I am hoping you have some raspberries in your freezer that you can use for the Raspberry Stars, but if you don’t, store bought Raspberry Jam works too.
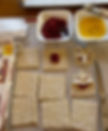

Raspberry Stars
1 Puff Pastry Sheet (each sheet will yield 9 pastries)
4 Tablespoons Filling (see above for recipe) OR Raspberry Jam
1 Egg
1 Tablespoon water
Powdered Sugar for dusting
Preheat oven to 400 degrees.
Line cookie sheet with parchment paper.
Lay frozen puff pastry on clean work surface and allow to thaw 10 minutes or more.
Do not unfold until thawed.
Unfold and cut it into 9 equal squares.
Beat the egg in a small bowl with the water, set aside.
With a sharp knife tip, score L-shaped cuts at the corners of each pastry square. You may need to use a kitchen shears to cut the L-shapes after using the knife.
Place 1 teaspoon filling onto the center of each square.
Take the outer corner of each puff pastry and fold over into the middle. Dip you finger in the egg water and use it to ‘glue’ each tip into the center. Do this with all four corners, shaping folds into a bow.
Using a pastry brush, brush the edges of the pastries with the egg water.
Bake for 13-14 minutes or until they puff up and the edges are golden.
Remove from the oven and transfer to a cooling rack.
Dust with Powdered sugar and serve.

Photo Credit: Joy Johnson (1,2,3,4)