

Bleach Dying Dark T-Shirts
Joy Johnson, Master Gardener
We’re always looking for activities for our children or grandchildren in the summer. A fun summer project to do with children, or adults for that matter, is bleach dying. It’s cheap, fairly easy, fun and educational. In this article you will learn how to use plants from your garden to create a fun and pretty design through bleach dying.

A fun summer project to do with children, or adults for that matter, is bleach dying. It’s cheap, fairly easy, fun and educational.
I think in lists, so this is written as a list, it may seem long, but the actually process goes quite quickly. I just didn’t want to leave anything out, so you can have a successful product.

1. Wear really old clothes and shoes that you don’t care about (or go barefoot).
2. Warn anyone who has cuts or scrapes on their hands, as children often do, this will sting a bit, so prepare them for that. It does do a really good job of cleaning their hands! I would not wear gloves; you need to be able to grab and move wet delicate leaves and coins quickly and carefully.
3. Equipment needed:
a. Two large buckets (5 gallon)
b. Bleach
c. Vinegar
d. A medium sized spray bottle to put the bleach in.
e. Lots of coins to use as weights. Rocks don’t work, I tried that.
f. Water
g. Kneeling pad if you’re doing this on the ground.
h. A large place to work outside (I strongly suggest concrete). DO NOT work on the grass. The bleach will kill the grass.
i. A dark colored t-shirt, one for each person, in their size. I chose black, but red, dark green and navy blue or brown work too.
j. Cardboard or layers of newspaper to put inside the shirts so the bleach doesn’t soak through. Remember though, the shirt needs to lay flat.
k. Extra-large weights for pressing down leaves that tend to curl. I used a piece of plywood and a wooden block.
4. Process:
a. Half fill spray bottles with bleach. Rinse them off in case you dripped some on the outside.
b. Fill one large bucket about 2/3 full with cold water. Add 2 cups of vinegar. This is your first rinse water.
c. Fill the other bucket about 2/3 full with cold water. This is your second rinse water.
d. Go snip or pick some leaves, ferns, flowers etc. Just remember that they need to lay flat. It’s helpful to choose leaves that have hair or fuzz on one side because they will stick to the shirt and you can gently press them flat with your hand.
e. Put the cardboard inside the shirt.

f. Lay the shirt flat on the concrete.
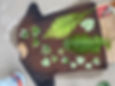
g. Lay leaves and ferns on the shirt in whatever design you choose.
h. Weigh them down with coins, being very careful to not let the coin go past the edge of the leaf.

i. Use plywood or heavy blocks to press delicate curly or especially stubborn leaves that don’t want to lay flat. (Depending on what you have, it might take a while for them to relax and flatten out) this would be a good time to have a snack and work on identifying the various plants that were chosen.

j. Remove any large weights carefully.
k. Spritz shirt with bleach by standing above it and spraying straight down. DO NOT spray at an angle or you will get bleach under the edge of the leaves and your design won’t be crisp.
l. DO NOT overuse the bleach. Wait about 5 seconds and the shirt should start to fade and show other colors. This part is quite fun, because you never know what colors are going to appear.
m. Don’t wait too long. The bleach acts quickly and will eat holes in your shirt if you don’t get it in the vinegar water.
n. Quickly and carefully remove the coins and leaves. DO NOT let them tip and drip bleach on your shirt. Remember they are covered with bleach. Any drips will show immediately. If you look carefully at the photos, I was moving too fast and dripped a couple of times when removing coins from the morning glory leaves. You can see that a couple of the leaves have drippy dots on them.
o. Pick up the shirt by the shoulders and immediately immerse it into the vinegar water bucket. Swish it around, loosen it up, work the vinegar water all through it while counting to 60.

p. Squeeze it gently over the bucket
q. Immerse it in the plain water bucket and again swish it around and work the plain water all through it, this time count backwards from 60!
r. Gently squeeze the shirt letting the water drain back into the bucket.
s. Hang on the clothesline to dry
t. Or you can wash all your shirts in your washing machine with a bit of detergent in cold water and tumble dry. Make sure no other clothes get washed with the shirts for this first wash. If you’re going to do this, have an empty, clean bucket or laundry basket by your work area to transport them to the machine. Otherwise, you’re going to have a trail of drips from outside all the way to your machine.
u. Throw all your leaves and ferns in the trash.
v. Rinse off all the coins in the plain water before returning them to your pocket!
w. Throw cardboard away or recycle.
x. Empty all of the spray bottles back into the large bleach container and thoroughly rinse them OR clearly label them “Bleach.”
y. Empty the water buckets and return all other supplies.

Photo credits: Joy Johnson (all)